本文使用的是 CentOS-6.4-minimal 版的操作系统(安装包为:CentOS-6.4-x86_64-minimal.iso)
网卡
CentOS默认没有启用eth0网卡,我们做的就是启用它
编辑vi /etc/sysconfig/network-scripts/ifcfg-eth0,再修改ONBOOT=yes即可
(如果是VirtualBox里的虚拟机,可以将VirtualBox配置为桥接网卡,就能让虚拟机里的CentOS联网了)
IPv6
若想检查当前IP地址中是否含有IPv6地址,可以执行ifconfig命令
若发现类似inet6 addr: fe80::20c:29ff:fee4:1d8/64则表明已含IPv6
我们目前还用不到IPv6,而CentOS默认是开启了IPv6的,所以要关闭它
编辑vi /etc/modprobe.d/dist.conf,在其尾部加入以下两行(若要重新开启IPv6的支持,注释这两行即可)
alias net-pf-10 off
alias ipv6 off
防火墙
- service iptables stop:关闭防火墙
- service iptables start:启动防火墙
- service iptables restart:重启防火墙
- service iptables status:查看防火墙状态
- chkconfig iptables OFF:永久关闭防火墙
- chkconfig iptables ON:永久关闭后启用
测试时,我启动了一个Mina写的小应用,结果发现笔记本无法访问虚拟机里的这个应用,但ping虚拟机里的IP却是通的
于是执行service iptables status发现CentOS默认开启了22端口(所以xshell可通过ssh连到CentOS),那么就要开通端口了
编辑vi /etc/sysconfig/iptables
我们会发现里面有一行是这么写的:-A INPUT -p tcp -m state --state NEW -m tcp --dport 22 -j ACCEPT
然后依葫芦画瓢在这一行下面写上:-A INPUT -p tcp -m state --state NEW -m tcp --dport 8080 -j ACCEPT
最后执行service iptables restart命令即可,此时服务器的8080端口就可以对外提供服务了
安装Tomcat
无需编译源码,直接tar zxvf apache-tomcat-6.0.41.tar.gz解压即可
再执行/app/tomcat/bin/startup.sh可以启动Tomcat了
安装Maven
[xuanyu@dev ~]$ cd /app/
[xuanyu@dev app]$ tar -zxvf apache-maven-3.2.5-bin.tar.gz
[xuanyu@dev app]$ rm -rf apache-maven-3.2.5-bin.tar.gz
[root@dev app]# vim /etc/profile
                   # Set Maven Environment Variable
                   MAVEN_HOME=/app/apache-maven-3.2.5
                   PATH=$MAVEN_HOME/bin:$PATH
                   export MAVEN_HOME PATH
[root@dev app]# source /etc/profile
[root@dev app]# echo $PATH
[root@dev app]# mvn -version
[xuanyu@dev ~]$ mvn -version
[xuanyu@dev ~]$ cd /app/code/
[xuanyu@dev code]$ mkdir MavenRepository
[xuanyu@dev code]$ vim /app/apache-maven-3.2.5/conf/settings.xml
                   <localRepository>/app/code/MavenRepository</localRepository>
[xuanyu@dev code]$ cp /app/apache-maven-3.2.5/conf/settings.xml MavenRepository/
安装Git
git-2.46.x 开始,编译时,会报告类似下面的错误:
http.c:655:28: error: ‘CURLOPT_PROXYHEADER’ undeclared (first use in this function)
是因为高版本的 git 在编译时,会依赖一些宏
比如 CURLOPT_PROXYHEADER,它是 libcurl 7.37.0 及之后版本中引入的
可以使用 curl --version 命令检查当前 libcurl 的版本
由于 CentOS-7 官方支持的最新版只有 curl 7.29.0,所以要么从源码编译安装最新版 libcurl,要么安装 git-2.45.4
# Git 工作时要调用 curl/zlib/openssl/expat/libiconv 等库的代码,所以要先安装这些依赖
[root@dev backup]# yum install curl-devel expat-devel gettext-devel openssl-devel zlib-devel gcc perl-ExtUtils-CBuilder perl-ExtUtils-MakeMaker
[root@dev backup]# wget https://mirrors.edge.kernel.org/pub/software/scm/git/git-2.45.4.tar.gz
[root@dev backup]# tar zxvf git-2.45.4.tar.gz
[root@dev backup]# cd git-2.45.4/
[root@dev git-2.45.2]# make prefix=/app/software/git-2.45.4 all
[root@dev git-2.45.2]# make prefix=/app/software/git-2.45.4 install
[root@dev git-2.45.2]# cd ..
[root@dev backup]# rm -rf git-2.45.4
[root@dev backup]# vim /etc/profile
                   # Set Git Environment Variable
                   GIT_HOME=/app/software/git-2.45.4
                   PATH=$GIT_HOME/bin:$PATH
                   export GIT_HOME PATH
[root@dev backup]# source /etc/profile
[root@dev backup]# echo $PATH
[root@dev backup]# git --version
git version 2.45.4
[root@dev backup]#
安装Subversion
下载地址为:https://www.open.collab.net/files/documents/60/11125/CollabNetSubversion-client-1.8.13-1.x86_64.rpm
[xuanyu@dev ~]$ rpm -q Subversion
[xuanyu@dev ~]$ rpm -ivh /app/CollabNetSubversion-client-1.8.13-1.x86_64.rpm
warning: /app/CollabNetSubversion-client-1.8.13-1.x86_64.rpm: Header V3 DSA/SHA1 Signature...
Preparing...                ########################################### [100%]
   1:CollabNetSubversion-cli########################################### [100%]
[root@dev app]# svn --version
[root@dev app]# vim /etc/profile
                   # Set Subversion Environment Variable
                   SVN_HOME=/opt/CollabNet_Subversion
                   PATH=$SVN_HOME/bin:$PATH
                   export SVN_HOME PATH
[root@dev app]# source /etc/profile
[root@dev app]# svn --version
[xuanyu@dev ~]$ svn --version
修改RPM安装路径
RPM 包通常都有默认的安装路径,但也可以修改这个路径(并非所有 rpm 都允许安装到其它路径)
下面通过 CollabNetSubversion-client-1.8.13-1.x86_64.rpm 和 jdk-6u45-linux-amd64.rpm 举例说明
通过二者的Relocations参数,我们可以看到 Subversion 是不允许重定位的,而 jdk 则允许
所以 Subversion 只能安装在默认路径下,而 jdk 则可以修改其默认的安装路径(/usr/java)
方法为执行命令:rpm -ivh --badreloc --relocate /usr/java=/app/jdk1.6.0_45 jdk-6u45-linux-amd64.rpm
其中:--badreloc是将文件强制安装到指定位置,--relocate是将文件从 oldpath 安装到 newpath
[xuanyu@dev app]$ rpm -qpi CollabNetSubversion-client-1.8.13-1.x86_64.rpm
warning: CollabNetSubversion-client-1.8.13-1.x86_64.rpm: Header V3 DSA/SHA1 Signature...
Name        : CollabNetSubversion-client   Relocations: (not relocatable)
Version     : 1.8.13                            Vendor: CollabNet
Release     : 1                             Build Date: Mon 23 Mar 2015 02:49:36 AM EDT
Install Date: (not installed)               Build Host: cu128.cloud.maa.collab.net
Group       : Utilities/System              Source RPM: CollabNetSubversion-client-1.8.13-1.src.rpm
Size        : 39281894                         License: Proprietary
Signature   : DSA/SHA1, Mon 23 Mar 2015 02:49:51 AM EDT, Key ID 80233a5a35bcca43
Packager    : Alexander Thomas (AT) <alexander@collab.net>
URL         : http://open.collab.net
Summary     : A Concurrent Versioning system similar to but better than CVS.
Description :
CollabNet Subversion client is a free download of open-source Subversion,
compiled and tested by CollabNet. For more information about CollabNet
Subversion, visit the CollabNet community at http://open.collab.net.
[xuanyu@dev app]$ rpm -qpi jdk-6u45-linux-amd64.rpm
Name        : jdk                          Relocations: /usr/java
Version     : 1.6.0_45                          Vendor: Oracle and/or its affiliates.
Release     : fcs                           Build Date: Tue 26 Mar 2013 07:54:12 PM EDT
Install Date: (not installed)               Build Host: jb6-lin-amd64.sfbay.sun.com
Group       : Development/Tools             Source RPM: jdk-1.6.0_45-fcs.src.rpm
Size        : 127250396                        License: Copyright (c) 2011, Oracle...
Signature   : (none)
Packager    : Java Software <jre-comments@java.sun.com>
URL         : http://www.oracle.com/technetwork/java/javase/overview/index.html
Summary     : Java(TM) Platform Standard Edition Development Kit
Description :
The Java Platform Standard Edition Development Kit (JDK) includes both
the runtime environment (Java virtual machine, the Java platform classes
and supporting files) and development tools (compilers, debuggers,
tool libraries and other tools).

The JDK is a development environment for building applications, applets
and components that can be deployed with the Java Platform Standard
Edition Runtime Environment.
安装CentOS-8.5
dvd iso 下载地址:https://mirrors.aliyun.com/centos/8.5.2111/isos/x86_64/
这里是在虚拟机里安装,用的是 VirtualBox-7.0.14:https://www.virtualbox.org/wiki/Download_Old_Builds_7_0
注意,从 VirtualBox-7.0.16 开始,要求只能安装在 C 盘(也可以安装在其它盘,不过要执行几个授权命令)
另外,VMware-workstation-17.6.4 有时安装完,发现本地网络适配器没有自动安装虚拟网卡(VMnet1、VMnet8)
即便是卸载、清理注册表、重装,也还是没有虚拟网卡,最后 centos-8.5 能联网,但是外部的 xshell 连接不上去
言归正传,整体来讲,主要有 3 点需要注意:
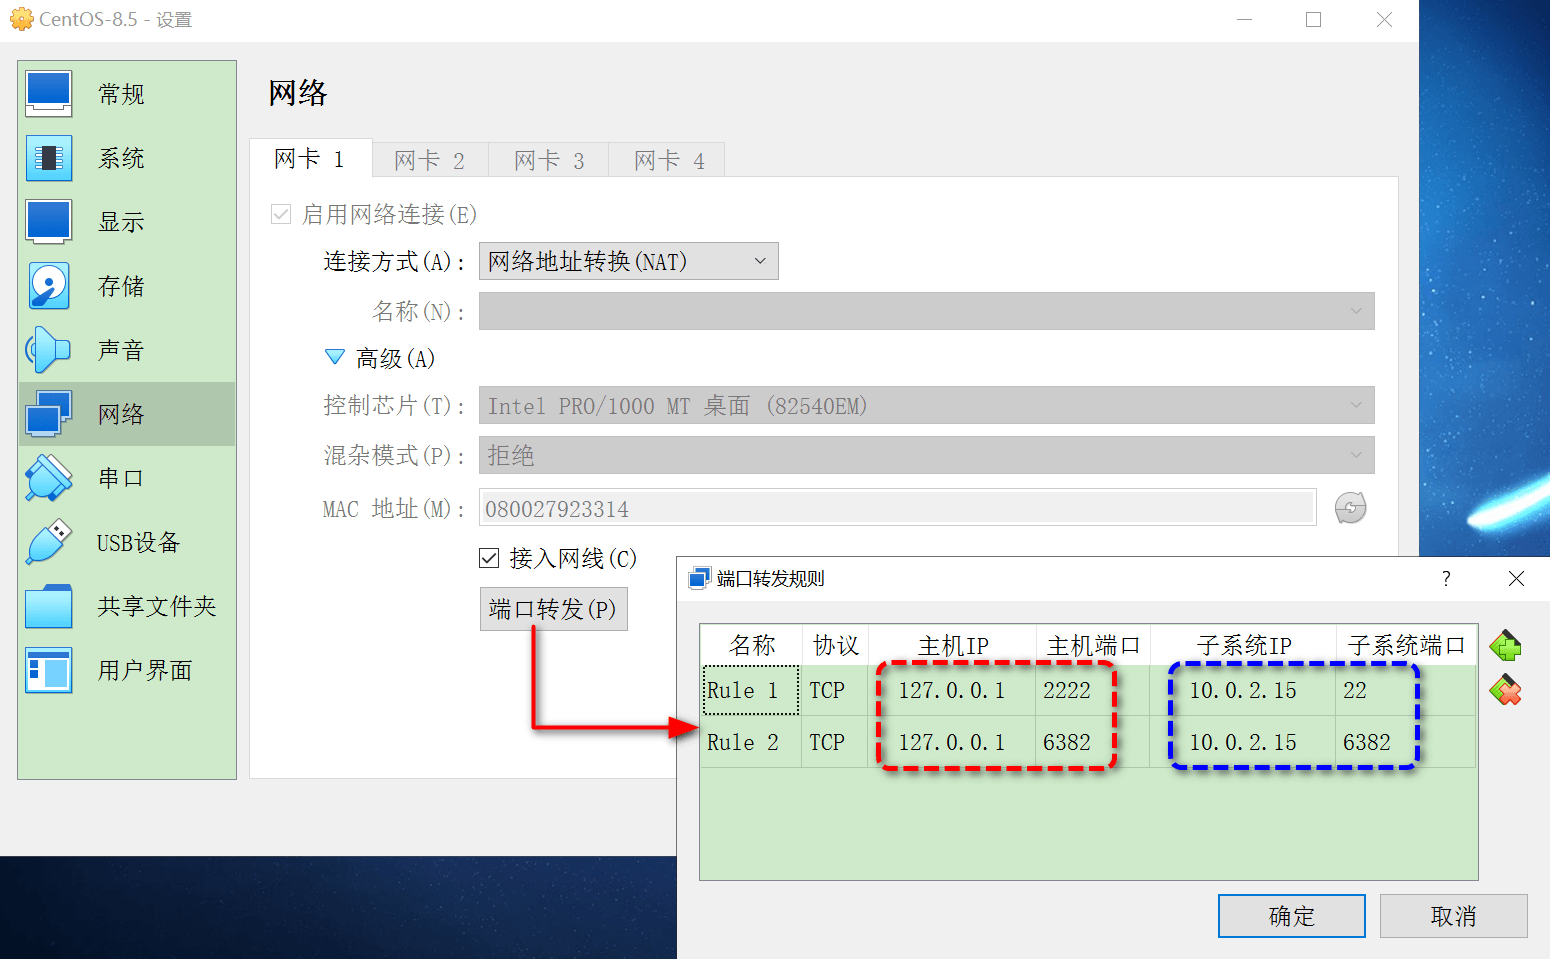
- 安装时,在安装界面把网卡启用了(我在这里启用时,显示的默认 ip = 10.0.2.15)
- 安装完,改下防火墙:https://www.xuanyuv.com/blog/20240426/aliyun-ecs-dnat-snat.html#关于新版防火墙
- 安装后,网络的配置,如下所示(centos-8.5 里面不用改什么,唯一的启用网卡,刚才已经做了)

如此一来,centos-8.5 就可以上网了,同时 xshell 可以通过 127.0.0.1:2222 连上 centos-8.5
截图里的 6382 端口是 Redis-8.2 的,本地的客户端也是通过 127.0.0.1:6382 就可以直连上去了
更换yum国内源
主要思路就是:备份源文件、下载最新的国内源文件、更新源地址、生成缓存
[root@xy ~]# cd /etc/yum.repos.d/
[root@xy yum.repos.d]# mkdir backup && mv *repo backup/
[root@xy yum.repos.d]# curl -o /etc/yum.repos.d/CentOS-Base.repo http://mirrors.aliyun.com/repo/Centos-8.repo
[root@xy yum.repos.d]# sed -i -e "s|mirrors.cloud.aliyuncs.com|mirrors.aliyun.com|g" /etc/yum.repos.d/CentOS-*
[root@xy yum.repos.d]# sed -i -e "s|releasever|releasever-stream|g" /etc/yum.repos.d/CentOS-*
[root@xy yum.repos.d]# yum clean all && yum makecache
[root@xy yum.repos.d]#